Growing Fruit Trees in Pots: A UK Patio Guide
October 10, 2026 - Gardening Tips

October 10, 2026 - Gardening Tips
October 07, 2026 - Varieties
Apple and pear trees forgive a great deal, but they do not forget a bad haircut. Cut one back hard in June and you will spend the next two summers removing the whippy regrowth it throws back at you. Prune in the dormant months instead, when the sap is down and the shape of every branch is plain to see, and the tree responds calmly: fewer water shoots, better fruit, and a canopy you can actually reach into at harvest.
What follows covers the whole job — the right weeks to be out there, how to shape a young tree, how to keep a mature one in order, and how to renovate an old, crowded tree without shocking it into a sulk.
Dormancy in the UK runs roughly from leaf fall in November to budburst in March, but the sweet spot is narrower than that. Late January to early March suits most apples and pears: the hardest frosts have passed, the tree is still asleep, and any cuts have the whole growing season ahead of them to seal over. Pears wake slightly earlier than apples, so if you grow both, start with the pears.
Avoid working in hard frost. Frozen wood is brittle and splits under the blade, and a cut made in bitter weather heals slowly. Dead, diseased or damaged wood is the exception — take that out whenever you spot it, whatever the month.
One important diversion: plums, cherries and other stone fruits should never be pruned in winter, because the open wounds are an easy route in for silver leaf. Deal with those in summer instead. This guide is for apples and pears only.
You need less equipment than you might think, but you do need it sharp.
Clean blades matter more than expensive ones. Canker and other fungal problems travel happily on a dirty saw, so a wipe between trees is cheap insurance. Beyond that, three rules cover most of it. Cut just above an outward-facing bud, on a slight angle, so water runs off rather than sitting in the wound. Deal with dead, diseased and damaged wood first — the "three Ds" — because once it is gone you can see what you are actually shaping. And never take more than about a quarter of the canopy in a single winter unless the tree is being renovated on a plan.
Young trees are mostly about structure. Aim for an open, goblet-shaped framework: three or four well-spaced branches radiating from a short trunk, with nothing crowding the middle. Choose those branches while they are still bendable, and remove anything that rubs, crosses or heads straight up through the centre.
Each winter, shorten the previous year's leader by about a third, cutting to an outward-facing bud. Do the same with the main side branches, keeping the tree balanced rather than letting one side race ahead. Within three or four years you have a tree with a strong, airy frame that light and air can move through — which is exactly what reduces scab and mildew later on.
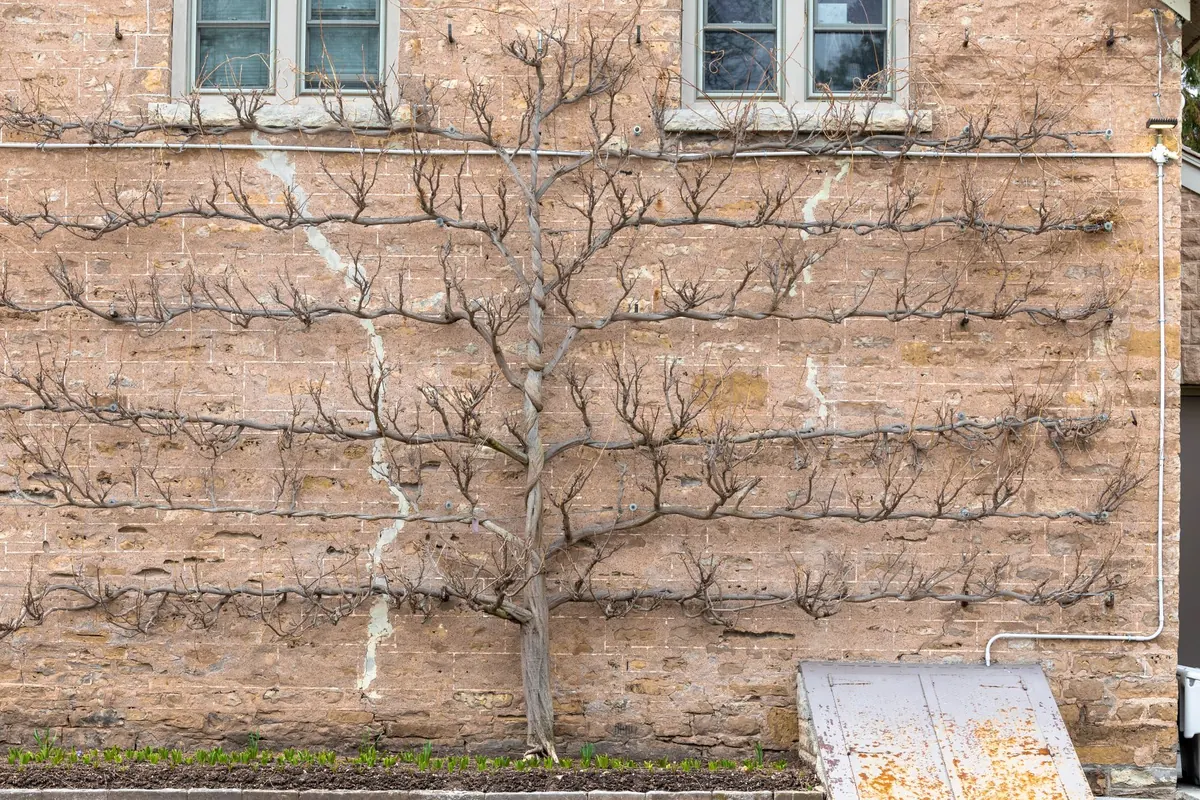
Restricted forms are the exception. Cordons, espaliers and fans are usually summer-pruned to keep their vigour in check; winter pruning is used mainly to build and extend the permanent framework, then left alone.
On an established tree, the job is renewal rather than shaping. Most apples and pears carry their fruit on short spurs on wood two years and older, so the aim is to keep a steady supply of young fruiting wood coming through. Take out a couple of the oldest, least productive branches each winter and let younger replacements grow into the space.
A few varieties — 'Worcester Pearmain' and 'Ashmead's Kernel' among them — also carry fruit at the tips of last year's shoots. On these, tip the new growth lightly rather than cutting it hard, or you will be removing this year's crop.
Beyond that, it is a matter of housekeeping: crossing and rubbing branches, growth heading into the centre of the tree, and the thin, twiggy clutter that shades the fruit and harbours disease.
Old orchard trees are often a tangle of congested wood with fruit only at the very top. The temptation is to cut it all out in one go. Resist that. A hard renovation on an old tree can push a mass of weak regrowth and leave it worse than before. Spread the work over three winters instead.
With saw work, take the weight off first: make an undercut a hand's width from the trunk, then cut from above, slightly further out, so the branch drops without tearing a strip of bark off the tree. Finish by cutting back to just outside the branch collar — the slight swelling where branch meets trunk. Do not leave a long stub and do not cut flush.
Expect a reaction. Renovated trees usually throw vigorous shoots from the old wood. Rub out the ones in the wrong place while they are still soft, and cut back the rest the following winter. Go easy on feeding for a season or two; a spring mulch of well-rotted compost is plenty, and a nitrogen-rich feed will simply give you more leaves and less fruit.
Wound paints are no longer recommended for ordinary pruning cuts. A clean, well-placed cut that the tree seals over itself is healthier than one painted with something that traps moisture and can seal in infection.
Bin or burn diseased prunings rather than adding them to the compost heap, and clean your tools afterwards. If you find canker — sunken, cracked patches of dead bark, often with a reddish tinge — cut back into clean, healthy wood well beyond the visible damage and disinfect the blade before you move to the next tree.
Start with the three Ds and a bucket for the debris. Step back and look at the tree from four sides before you cut anything, and again after every few cuts; it is much easier to avoid a lopsided tree than to correct one. Work from the inside outwards, thin before you shorten, and stop when the tree looks open enough for a blackbird to fly through.
Sharpen the tools, clean up the prunings, and leave the tree alone until next winter. That is the whole trick: a little attention every year, rather than a rescue mission every decade.
Photo: Ali Soheil / Pexels
Dwarf rootstocks, the right pot and steady watering turn a small patio into a productive orchard. Here is how to...
Reliable apple varieties for UK orchards that resist scab, mildew and canker, so you can spray less and still pick...
October 10, 2026 - Gardening Tips
October 07, 2026 - Varieties
Copyright © 2026 Orchard Zone. All Right Reserved.